Drawing, Clay,
& Design

Return to Sitemap

Rev. 2003-07-14, -08-23, 2004-01-07, 2005-10-11, 2008-01-29, 2009-01-24, 2011-02-22

Drawing Wire Clay Design

Drawing

Ed Schmid, in his terrific hand drawn books on glassblowing, says that every glass worker should be drawing continuously and he gives a lot of good reasons for doing it.  Obviously, carrying a piece of paper and a pen or pencil makes it easy to capture an idea or record a design seen and if not in hand, something can often be borrowed.

But another important reason is the feeling one gets while working on the drawing.  As one works on a drawing, even trying to make halves match gives a feeling for the piece - which curve drawn is more interesting. One is also concentrating on the lines of the piece, discovering things that slide by with less focus.  Recently, I was attracted by a Picasso etching on display at the Fort Worth Modern, so I began to copy/draw elements of it.  After a while, I realized that drawing right handed I was finding some of the curves very awkward.  Since I am ambidextrous, I reversed my stance and found it easier.  One conclusion I might have from this is that Picasso was right handed, since the etching reverses the action of cutting the plate.  Another is that drawings/etchings have a "hand" that may not be noticeable on first impression.

Here are some drawings with comments.


The drawings at right are a simple thought exercise.
First a sketch of a simple triangle with rounded corners. It was started to record an idea and to see the shape on paper - the shape of a form to mold wax around to form a casting for a goblet.  Each of the three sides and corners is different and two of the corners have been repaired, but it is the start of an idea.  The lower side is the one I find satisfying.  The upper left corner is the least.  If I were working further, I would probably try to make all three sides like the lower side.

Instead, I went on to draw the one below.  I wanted to get a feeling for a concave shape for the same casting purpose, although it is also interesting as a glass shape.  Again no two sides or corners are alike and all the sides show signs of re-sketching, the left side showing the most.  Instead redoing the drawings, I turned to clay, having gotten the basic idea.

Basic drawing triangle shape
Having previously made goblets with cast stems by dribbling wax over egg shaped cast investment forms, I began thinking about a pear shape that I also have.  In the sketch, the first raw pear form is smoothed out and narrowed and a rough sketch of a face is added, with a neck for a base.  The questions raised include what is to be done with the other side or two sides - 3 faces, 2?   Not answered, though two would make the ears work better. One face with hair on the other side? Basic drawing head shape
I have been modeling stems in clay to make 3 prong base.  This is clumsy attempt to sketch the effect of a curving root.  Not happy with effect. This is drawing in which learning about drawing is still being done.  It also sends me to clay. Doodling a 3D shape
Bottle mold sketch Here the purpose of the drawing is to explore the limits of custom making 3 sided bottles.  Based on a 6" wide, 3 piece blow mold housing which gives the 3.77" for a side noted at the bottom, the sketched insert, which might have a name or company logo cast in it would be about 2.5" by 4"
I attended M.I.T. for a while and one class I took had to do with drawing, drafting, and otherwise recording your idea (at a time when computers meant punch card input only.)  The best suggestion I have had on drawing came from that class: turn the paper to make the drawing as easy and accurate as possible - there is no requirement that the drawing be done upright. 
To the right is a scan of three sketched lines.  A is the brisk freehand drawn line.  B is an attempt to mirror line A, drawing it curving up with the paper in the position shown.  C was drawn by turning the paper around, so the wrist action would be the same. 2003-05-22
Three sketched lines
This is a planning drawing of a 3 piece mold for a votive candle holder with a log bark pattern on the curved surface. It is the end or section view.  It follows a number of small sketches and was done full sized to plan some of the final complications of fitting the pieces before casting them.  Because of the needs, it is more precise in its construction.  Note that the free hand still reflects choices in the shape.

In the original, the outer circle and 6x hash markers were drawn with a compass as were the curves of the bottom's ends..  The 6 outer straight lines and ones to center were drawn with a straight edge, as were the added lines of the bottom and the left log curve.  The rest were free hand drawn.  After the drawing was scanned, because some parts of it were very light, a graphics draw tool was used to strengthen the 9 straight lines of the hex and the three lines of the bottom.  2003-08-19

Drawing of end of 3 piece mold for log
This is a rare exercise for me - attempting a figure in some way.  This happens to be of part of a small terracotta figure in an exhibit at the Kimbell Art Museum that I went to see last Sunday.  It is Rhine parting the waters, a reclining god figure.  The musculature is very well defined, the water running from the jar like drapery, the smooth finish of the jar contrasting with the rock the water falls to.  The medium is a fine tip ball point art pen on a drawing pad I carry.   The drawing was started on the left and once past the middle, it became a matter of where should I quit as my feet are getting painful from standing still.  My goal was to get the essence of this image, try to capture some of the muscles and the hands and the shadows.  The face with the shadows and beard is scribbled. (The thing in the middle is a flat paddle shovel for digging the river Rhine.) 2004-01-07 Art drawing of terracotta statue
DRAW ANYWHERE - These two images are from the top and bottom of a page of a computer printed schedule.  The upper one just below contains a detail of the adjustable bench showing reminder notes of the connector of the crank, the path of the cable being worked out and the details of the overlapping of the various sized tubing.  Because of the details, it is probably not a first drawing, but a working out reminder -- by drawing it, a detail I missed before becomes apparent -- maybe the small bolt at the bottom or the fitting of the cross shaft various sizes. 20008-01-29 (paper week of 2007-07-23)
Drawing notes on a schedule as a sample
Further down the page are a series of sketches and the one in the top row right gives away when these were done and why.  I was in Ft. Worth visiting museums and an exhibit at the FW Community Art Center included a stunning table-like sculpture that was all wood but appeared to be liquid dripping from 3 levels, making round wave rings and puddling on the floor. These sketches were done on the way home to see how layers of thin trays with real water might fit together to be interesting.  Sometimes a set of drawings like this will have arrows between them to remind me of which led to which.  Not here, so these were probably drawn left to right, second row parts following on first above each. 2008-01-29
Drawing sample multiple images on schedule
Small wire models and drawings.Wire - This image shows that "sketching" does not have to be done only on paper. As explained here, the paper sketches show planning for a spiral tail, but the copper wire shows further work plus the added wire mini-shapes.  The photo was taken in the sun so the crisp shadow of the spiral shows what I was trying in the sketches.
2011-02-22


DRAWING TABLET PAD - Wacom dominates the market in small digital tablets and I have one their smallest and cheapest: Graphire. [http://global.wacom.com/graphire/features_benefits.cfm]. I find the current version is bigger than the 3.6x5 active area one that I have and now has got Bluetooth as well as USB connection. Still comes with mouse and pen.  I love it and have enhanced it with springy little accessory points that spread the pressure movement over greater distance so it is more like a brush.  Pressure can be used to change the width, the opacity, or color of the drawn line.  With tool options in Paint Shop Pro I can make the brush build up as I go over an area.  Although my area is small, I find I can work as I wish, doing line drawing and enlarging to do editing.  I can see that someone used to arm movements for drawing as opposed to my wrist and finger, would find my size very limiting.
Drawing of bottle before and after editing 
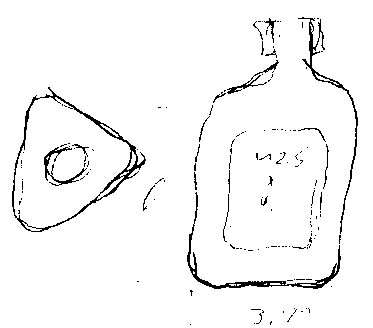
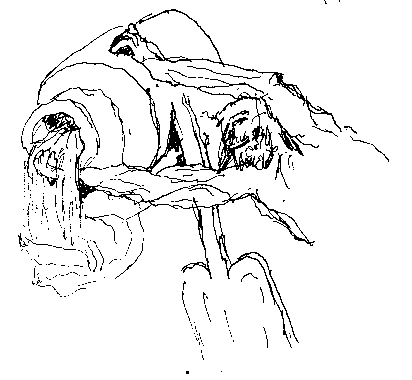
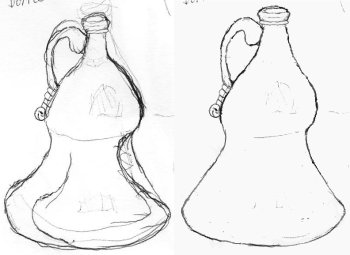
When I do drawing when traveling, I commonly use a black ball point pen which does not erase, so I do over-drawing.  After scanning, I can edit, smooth, and modify to better represent the object I am recording. The pen has a drawing point and an eraser end.  This is really handy when editing, because it means using it like a pencil instead of selecting the erase tool with the pen end and then selecting the draw tool to continue (which I can still do as the drawing tip has more options than the eraser end.)  Since I am often sketching in a hurry or in an awkward location (and I am not wonderful as artist), I produce drawings with multiple lines to get proportions more correct, etc.  The drawing shown is of a wide based brown bottle at the DMA.  The first sketching produced an image much more slender than the funky wideness of the bottle so I redid the base and adjusted the left and lightly sketched in a heavier mouth.  On the computer after scanning, I erased unwanted and too thick lines.  By taking a selection of the original mouth and flipping that, I was able to widen and raise the mouth to a more correct proportion without trying to hand draw the symmetry again.  I can see a few more changes I might make for a more symmetric bottle, but this works.   2007-12-12 from Hot Glass Bits #49 2007-12-05
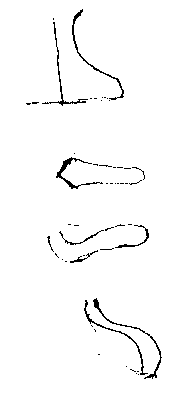
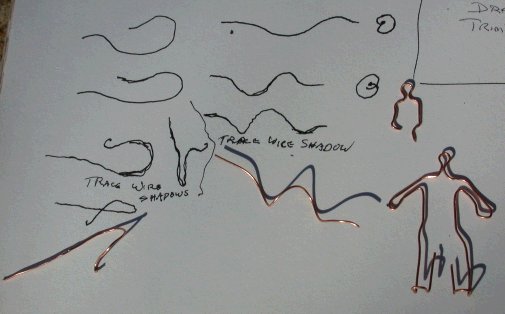
 It is possible to draw in 3D with wire, which may make visualizing something easy when the drawings just don't work, example here.

Clay

I have grown to like clay, especially Plasticine clay, for working out ideas.  Three modern forms of clay are available in small quantities for easy use. 
 Sculpy is a modern plastic clay that comes in many colors and handles reasonably well. It says soft at room temperature.  It is widely used for making jewelry and beads because when baked in an ordinary oven, it becomes hard and glossy.  It must not be overheated because the fumes are fairly noxious.
 Pottery clay is a natural product, dug from the ground, cleaned and packaged wet or dry.  Many, many versions are available. Small quantities of some types may be had from craft stores with many other choices at ceramic and pottery supply outlets.  I use white potters clay, 25 pounds for about $10.  All potters clays are intended to be fired at a fairly high temperature and are weak when air dried.  They must be kept wet to be workable and if they dry out, they can be rewetted if it is done slowly - quickly and the outer part becomes sloppy while the inner is still rigid and fragile.
 Plasticine clay is a mix of natural clay with oils that never hardens although it is more or less stiff at various temperatures, softening when worked by hand, hard to work at cool room temps.  It is available in one pound bricks (and bigger) in green from ceramic and sculptors supply sources and is the commonly available multicolored sticks about the size of butter that are/were sold as children's clay in grocery and toy stores.
 Besides sketching in clay I have been using it to make models for casting in brass and aluminum and though I haven't used it this way, in glass powder (pate de verre).
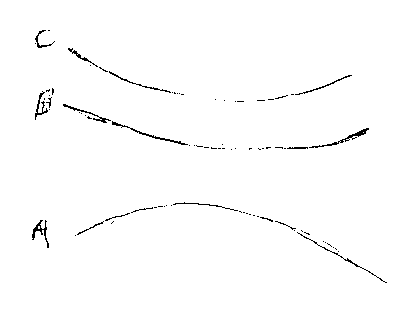
 

Design

Any method that works can be used for design, but it really helps to be able to modify the early versions.  With drawing, this normally means either drawing over the first lines, erasing part of the work, or redrawing the essentials of the first lines and continuing.  The latter, to my mind, is the preferred method as it retains a record of what went before.  Also, by making several copies during the redrawing, one can go in several directions.  And, of course, if one is using pen, erasure is barely possible (white out?) and overdrawing quickly becomes a mess.  On a large enough scale, it may be possible to use one or more colors of inks to impress a couple of new ideas on the original and compare them by refocusing the eye and mind.

Contact Mike Firth