|
"Rombout, Jan" <jrombout@sein.nl>
Sent: Thursday, September 13, 2001 8:30 AM Subject: Crucible
making |
|
I started with a plastic dish basin, which turned out to be too small to mix, and ended using a flat Rubbermaid RoughNeck (they come in upright or flat and have good lids) which has a lot more space. I measured the amounts using a bathroom scale and a postal scale. To measure 4.25 pounds, I took 12 ounces out of the 5# I bought. I poured the grog in first and gradually added the other ingredients, spreading them out and stirring them in somewhat. It seemed the less the ingredient used, the more dust it raised. I added water gradually, keeping records of what was poured. I didn't weigh the water, but used a measuring cup (a pint's a pound) to measure 2 quarts, 1 pint, 1/2 cup. I think a spray bottle with some of the water in it would have been a good choice for laying the dust and wetting just the top. [On the next batch, I am going to mud down the lesser ingredients and add the grog on top.] I rearranged the material with my hands. The wetness was very uneven with soggy spots and dry areas. [Later I used a short multi-tine cultivating fork sold for garden use, much better and breaking into dry areas.] After pushing it around, I began picking up large handfuls and squashing them at one end, stacking the handfuls. Having cleaned one end of the RoughNeck, I turned it around and began taking handfuls again, carving down through the layers with the edge of my hand and squishing into new layers. I found some concentrations of one ingredient. After doing the stacking a third time, I put a layer of plastic over the clay and put the cover on to let it settle. David Gruenig says to let it sit for "a few weeks", which is a lot longer than I want to wait. 8/21/93 After about a week of sitting in the hallway (inside at 75° while outside was 100°), I took the Roughneck out back to a solid surface and began cutting the lump in half sideways and smashing first one half then the other down in the free space at the other end of the container. Butler recommends doing this eight times, which I did, ending with a lump about 16x16x2 inches. Doing the cutting and stacking eight times produces 256 layers, which in a 2" thick lump are each 1/128th of an inch thick. The material is extremely sticky and about the consistency of thick oatmeal, although very heavy. With the water given, it smashes to a mounded lump (cow patty) but does not flow on its own. It takes considerable effort to lift each half lump repeatedly and to scrape the remains from the plastic container bottom. 8/28/93 David Gruenig's description of pot making requires an inner and outer mold. A book on mold making mentioned the stuff is pretty weak until dried and fired. I have made my outer mold by taking a plaster shape I made earlier inside a Corelle cereal bowl, covering it with plasticine clay to about 3/8" (all the clay I had), and pouring plaster over the outside in a pot. In one version, Gruenig uses an inner mold and makes the outer mold from fiber glass on the first clay pot, which saves using extra material like the plasticine. I had extra plaster and 3/4 filled a Corelle cereal bowl, giving me a thinner insert that will make thicker walls. I used a rasp, screwdriver and sanding mesh to smooth the plaster outer mold, since I had not smoothed the clay as much as I might. 8/21/93 See below for making without an inner mold. The outer mold needs to be about an inch larger than the clay covered inner plug and at least 1/2" deeper. I have used stainless dog food bowls we have in the house. Since the plaster gets hot as it sets, the plasticine gets soft and makes removal of the inside and clay easily if done properly. Clue: Plasticine clay is sold in most grocery stores in the Toy section (not school supplies.) To make the crucible, cover the inner core with thin cooking plastic wrap, flatten pieces of ceramic clay and slap them on the core, pounding to merge. Pounding is much easier on the outside of a core than inside a shell and the smooth core produces a smoother surface against the melted glass than a pounded inside. Sliding on the outer support shaves off extra clay and then allows removal of the core so the crucible can shrink while it becomes thoroughly dry. Slide the core out of the plastic wrap and peel the wrap out of the inside. Smooth the inside as needed. Allow the crucible to dry thoroughly and totally in the outer shell where it will shrink as it dries. 9/21/93 The shell shrinks a lot and must be supported from the outside as it will crack if supported inside. Handle carefully. I let mine dry for over a week. Place the crucible in the furnace or glory hole (or kiln) and slowly raise the temperature to the 2400 degree use point. See IGB for notes. The crucible survived the cooling cycle. I warmed it fairly slowly, taking an hour to get up to 1000 or so and another half hour to 1500. 9/2/93 It has now survived three cycles of firing. 9/20/93 [Commercial crucibles will not survive this heating cycle, see below.] I have already started a second set of plaster molds for a deeper one. In making small crucibles, two plaster molds are needed: one for the inside and another for the outside. This calls for two containers, one to form the inside plug and the other to hold very outside of the outer mold. I form the inner mold with a bowl (like a small mixing bowl) or large cup (such as a 4 cup/1 quart Pyrex kitchen cup.) I coat the container with Crisco. I find it easier to get stuck molds out if the container is not metal - I put it upside down in the microwave and the steam generated pushes the plaster. Choose a container with enough slope to the sides to release easily. I made several small crucibles in glass slope sided custard cups (pyrex) where I could squeeze the clay between my thumb and the glass to assure even thickness and consistancy. This worked ok and I melt small pieces of intense color in them. I used a metal Kitchen Aide mixing bowl (yes, the expensive locked base kind) to try to make a large crucible by a similar method. Since the bowl had an odd bottom, I poured about an inch of plaster to level it. While the making went ok, it was more difficult judge the thickness and I could not look through the metal to see defects, which there were. From now on I will use the inner mold, outer mold technique to insure that holes do not exist. 6/17/94 A local artist had a 200# batch of the recipe above mixed and
pugged by a Ft.Worth ceramics supply company and made a series of
crucibles for a demo tour. He made his crucibles by pounding the
clay in a stainless steel mixing bowl, making the walls thick
enough so he could invert the bowl on a plywood panel, lift the
bowl off and smooth the outside, then replace it for drying. He
did not use an inner mold. He fired the crucibles in his glory
hole, bringing the temperature up fairly slowly at first. He made
enough to provide for a new one every day of the trip. In fact,
he used only one, putting over 400 pounds of glass cullet though
it, bringing it to heat and shutting it down every day (7 times)
At the end, the crucible shows fine vertical cracks about 1/3 of
the way down from the rim which are sealed with glass. The bottom
of the crucible shows no flaking which would stone the glass. [Long term
use of my largest pot has not been done. Repeated use - maybe 30-40
heatings over several years - I am having problems with stones in my glass but I
don't know if they are from the inside of the dome (which I tried a fix which
didn't help) or inside the pot, although the pot looks smooth. 2005-09-01] |
|
I recently made a crucible for melting
brass and aluminum from the same recipe. I used plaster set in a
plastic bowl for the inside and after applying the clay, used
white sheet strips dipped in another batch of plaster to build up
a shell like a plaster cast. This worked quite well. The pot has
survived several heatings in the glory hole to melt stuff. 2/26/97
8/29/98 I began the process of making a second batch. The
amounts were the same with the exception that Trinity Ceramics
felt there was no difference between kaolins and thus had no
Georgia Kaolin, so I bought more of the EPK. (I actually got
these last year, so I had plenty of time to get the Georgia
Kaolin, but I didn't. Since I drove out and picked the stuff up,
there were no direct shipping charges.) This stuff was very very
dry, having sat in plastic bags inside paper bags in my garage
through this remarkable summer (average high last month, 102F,
average this month 101F per the electric bill.) Following my
previous suggestion, I put the water in first and added the
smaller dry ingredients slowly and then added the grog, using my
favorite castable/clay/garden/etc. mixing tool - a four prong
heavy wire hand cultivator - along the way. Then I mixed more
with the cultivator, very stiff, and hand cut and piled the stuff
as mentioned before. Not as sticky as before, drier, but more
even and still fairly sticky. Added a bit more water, covered
with plastic and brought inside. |
|
It works well and I continue to use it. I just made another flat pot for the gloryhole. The last one cracked after 10 or so uses, but I heated it at a wildly too high a rate, skipping a preheat stage I usually use. Normally I take an long unused glory hole up to 400-500F with an electric element, then use a small burner through the door to take it up to 1000-1200F over an hour or so, then turn on the big burner at a low setting for fifteen minutes or more and then turn up the full heat. This is much faster than commercial crucibles will stand. (below) I just buy grog along with the other ingredients from
ceramic supply. If I were making and using a lot of pots,
grog is just ground up old pot - that is fired clay pounded to a
coarse grit. |
|
[Discussion previously provided has been omitted at demand of author who had given permission but has changed mind.] Commercial crucibles for glass are carefully made to avoid shedding bits of pot into the glass over a long melting operation. This means that often they are fragile and really hate being heated (or cooled) too quickly. A Laclede-Christy crucible has a recommended heating rate of about 70ºF per hour with one comment that after getting to red heat it can be taken up faster. Engineered Ceramics pots have a suggested rate of about 300ºF/hr. The first rate results in 30 hours to get from room temp to 2170ºF; the second in 7 hours. Further, the cooling should go the same way. EC pots have been reported to survive power failure shutdowns in well insulated furnaces, but other brands will require controlled ramp down to keep cooling at 1-2 degrees per minute. Either rate is a problem for people like me who blow for only a couple of hours when we can. Either rate also requires a full control system on the gas system including automatic relight. So the formula at the top of the page is more likely to shed bits into the glass if used for a long time, but heats up faster. There are still limits. I normally preheat my glory hole/furnace with a 1000 watt heater for a couple of hours to dry it out, then light off the gas and let it flame/candle without blown air for up to an hour, then turn on the blower and run up the temp fairly rapidly.
|

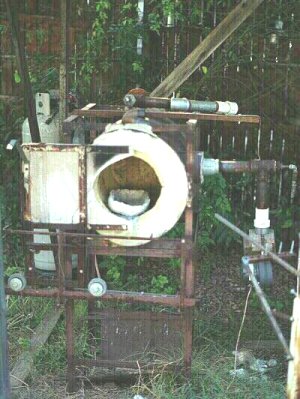 The front view of the glory
hole at right
The front view of the glory
hole at right  Other sources of crucibles
have a schedule like the one in the diagram from Dyson. Degrees are
Celsius. A 2000F rise is a 1111C rise. Note that the numbers given for F &
C do not agree: the C rise converts to 99F, not 130. Using the 99F rate,
it takes 26 hours to get from 70F to 2010F, which is why furnaces are
traditionally left on all the time. The trade off is that this formula
will probably not produce as clean a glass as the more expensive and slower
heating products.
Other sources of crucibles
have a schedule like the one in the diagram from Dyson. Degrees are
Celsius. A 2000F rise is a 1111C rise. Note that the numbers given for F &
C do not agree: the C rise converts to 99F, not 130. Using the 99F rate,
it takes 26 hours to get from 70F to 2010F, which is why furnaces are
traditionally left on all the time. The trade off is that this formula
will probably not produce as clean a glass as the more expensive and slower
heating products.