|
Bottle Cutting with Torch
Cutting glass with a fine tipped torch is old news having been used in the
automated glassware industry for decades and by certain art glass goblet makers.
The problem for most of us is the very small hot flame and turning the bottle.
One choice is discussed below. I was told of a goblet maker who sheared
his by setting them on an old record turntable. I recently received a phone call
from a guy (who promised photos) who said he used the miniature oxy-butane torch
that uses tiny tanks that look like the CO2 cartridges used in seltzer
dispensers and he spin his bottles by tying a yoke on the neck so it hangs
straight and twisting the hanging long cord so it spins for a while. As
with hot wire, the glass may crack on cooling rather than heating. 2009-09-17
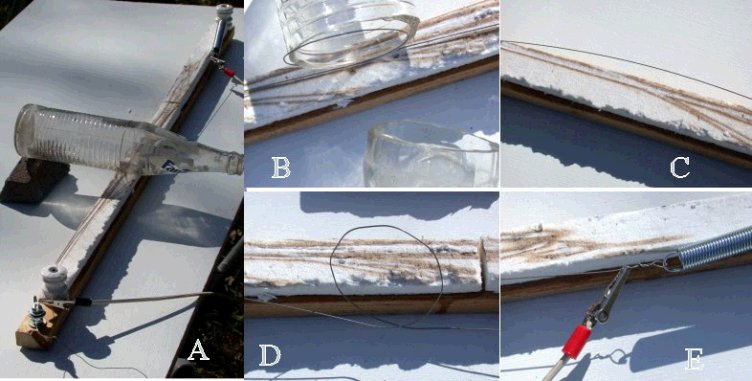
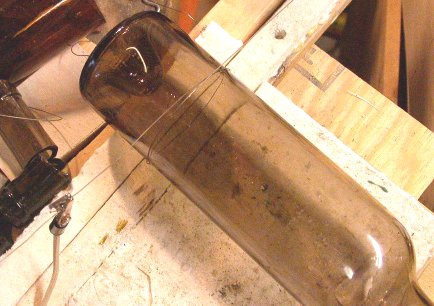
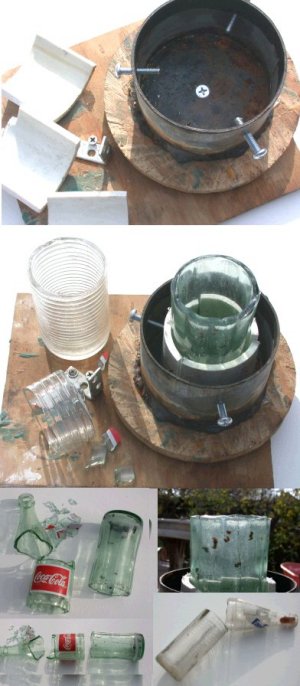 I took various parts I had around and combined them into a rotating bottle
holder and "cut" a couple of bottles with a fine tip welding torch - worked good
with and without scoring. Following comments on CraftWeb about using a
record turntable, a carbide scratcher and a very small torch, I headed for the
garage. I took various parts I had around and combined them into a rotating bottle
holder and "cut" a couple of bottles with a fine tip welding torch - worked good
with and without scoring. Following comments on CraftWeb about using a
record turntable, a carbide scratcher and a very small torch, I headed for the
garage.
I found the Lazy Susan swivel built for
drilling my rod optics and a 3" piece
of 4" conduit welded to a plate with a center hole made for use as a punty mount.
I drilled the swivel in the center to take a bolt through the center of the
holder, with a clearance hole below for access to the nut and counter sinking
the bolt head for a level surface inside the holder. I tapped three holes
at the 1/3 points about 2" up and installed short 1/4" machine screws.
Originally I cut 3 wood blocks to hold the bottle, but they were too thick at
3/4", so I cut a 3" section of 3" PVC and divided it into thirds. I had to
further trim the PVC sections to fit around the bottle. Adjusting the 3
screws centered the bottle on the turntable. The turntable is less than perfect, it turns
but with a bit of a hitch at one point. After running tests, it dawned on
me that I could use a socket on the nut underneath and turn it with an electric
screw driver or drill.
I put the 00 welding top on my Oxy-Acetylene torch and turned the gas pressure down.
Bracing the torch against the table, I started turning the bottle by hand and
pivoted the torch in to play on the bottle. After a few turns, the bottle
snapped on the the line of the torch. I tried a couple of more bottles,
cutting at more than one point with the following results.
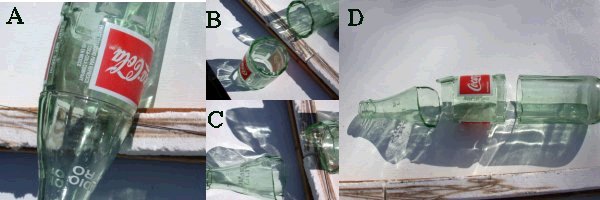
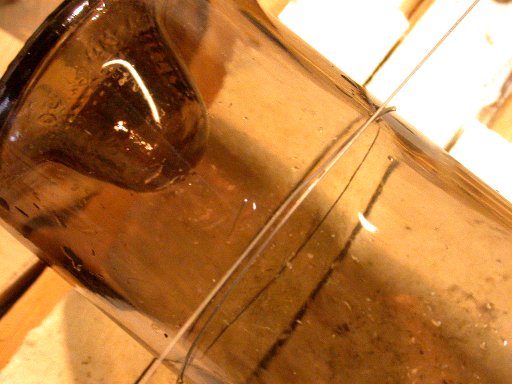
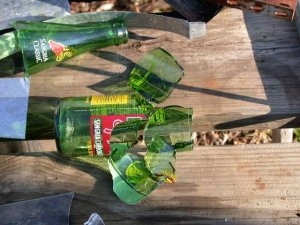
- The top of a Coke bottle disintegrated when the turntable hung up briefly
(right)
- A bottle scratched all the way around had a crack that wandered up and
down. (not shown)
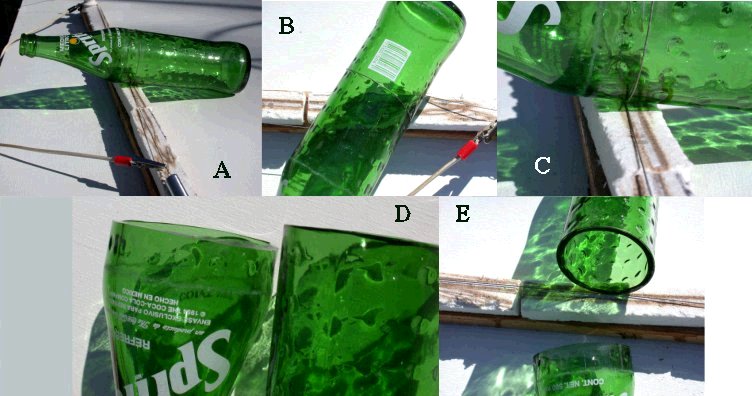
- A bottle unscratched produced a lovely even crack while heating.
- A bottle unscratched was heated for longer than average without cracking
but cracked perfectly when the torch was removed. (This also happens with hot
wire sometimes.)
Even the best cuts require smoothing and polishing as described at the
end of Freehand.
|
|
Freehand
All you need is a wooden V, a glass cutter and a 1/4" steel
rod bent at the end with a rubber ball shoved down on it. (below) And then
practice, practice, practice!!!
Most commercial bottle cutters are junk that endures a fad of
heavy advertising on television every few years. Typical price is $29.99 for
something worth about 4 bucks and it still takes practice and skill to work.
I will offer one small exception to this statement as there is now (2003-01) a
unit that looks like it might work better - it has three rubber wheels and a
cutter wheel mounted in the corners of the bottom of an L-shaped platform, the
upright keeping the bottle aligned, so pushing down centers the bottle and
pushes on the cutter one shown here:
bottle cutters - bottle cutting
kit - stained glass supplies - tools
Here are previous notes.
Book: 101 Projects for Bottle Cutters, Fischman, 748.2 F5290
Dallas
Pub.Lib Downtown
Good basic reference for methods, shows about half a dozen
cutting methods/jigs and about the same for breaking, including
ice, fire, nichrome and tapping inside. Projects not reviewed 3/13/95 In
August 2003, I ran into this book again and took a look at the projects.
They are absurd. Most result in something that looks just like a bottle
with a chunk missing. Several call for cutting into the side of a bottle
which isn't really covered in the cutting area. One project is cutting the
bottom off a bottle to make a coaster for a glass. Another involves
cutting the bottom and neck off the center, gluing the bottom to the neck to
make a door handle, glued to a spindle (the middle can be a lamp chimney in
another project.) Sad.
The tools needed are a simple glass cutter used for flat
glass, a trough to hold the bottle, and a rod to tap the score
around the bottle. These are described in the process description
below.
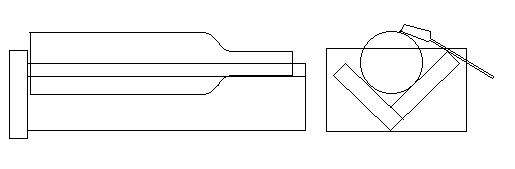 The proper way
to cut bottles is to use a glass cutter (like for window glass,
cheap at the hardware store), placing the bottle in a V-shaped
trough (Two pieces of wood nailed at edge with another to act as
stop for the foot.) Add a brace or hold the edge at the correct
point so the cutter is held fixed (it helps if the wood is wide
enough so the hand can rest on the wood, say 1x4" wood for
ordinary bottles) and the bottle rotated underneath it. Do not go
over the score repeatedly, do it once and don't waste time after
scoring the bottle, it becomes harder if you wait - it "heals". The proper way
to cut bottles is to use a glass cutter (like for window glass,
cheap at the hardware store), placing the bottle in a V-shaped
trough (Two pieces of wood nailed at edge with another to act as
stop for the foot.) Add a brace or hold the edge at the correct
point so the cutter is held fixed (it helps if the wood is wide
enough so the hand can rest on the wood, say 1x4" wood for
ordinary bottles) and the bottle rotated underneath it. Do not go
over the score repeatedly, do it once and don't waste time after
scoring the bottle, it becomes harder if you wait - it "heals".
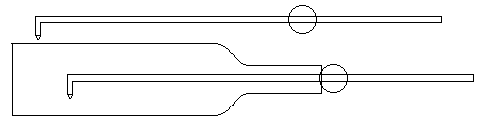 After
scoring the bottle, a metal rod bent at the end is inserted in
the upright bottle and the glass is tapped, starting a crack,
which can be seen as a silvery surface in the glass, and worked
around the line on the bottle. The rod is most effective if it is
heavy enough (3/16" or 1/4") to have its own momentum
and if a rubber or wooden ball is drilled and mounted on the rod,
then adjusted to rest on the neck so the bent end hits the same
point down in the bottle every time. The bent end should be very
short (especially for cutting wine bottles with small necks) and
the tip should be sharpened to a blunt point for precision. With
a stiff rod, it may be necessary to bend the tip long (1")
to be able to bend it then saw it off short (3/8") and point
it with a file. The middle of the rod may have to be bent to
reach the wall of the bottle in bottles with long narrow necks
and steep shoulders. Check this before scoring the bottle (shown
straight in drawing, would have to bent to get near shoulder. After
scoring the bottle, a metal rod bent at the end is inserted in
the upright bottle and the glass is tapped, starting a crack,
which can be seen as a silvery surface in the glass, and worked
around the line on the bottle. The rod is most effective if it is
heavy enough (3/16" or 1/4") to have its own momentum
and if a rubber or wooden ball is drilled and mounted on the rod,
then adjusted to rest on the neck so the bent end hits the same
point down in the bottle every time. The bent end should be very
short (especially for cutting wine bottles with small necks) and
the tip should be sharpened to a blunt point for precision. With
a stiff rod, it may be necessary to bend the tip long (1")
to be able to bend it then saw it off short (3/8") and point
it with a file. The middle of the rod may have to be bent to
reach the wall of the bottle in bottles with long narrow necks
and steep shoulders. Check this before scoring the bottle (shown
straight in drawing, would have to bent to get near shoulder.
If cutting a large diameter bottle (demijohn, gallon jug) it should be good to
not bend the end to 90° but choose a somewhat more
open angle so the end is at 90° to the glass
at strike so all the weight it just behind the tip. 2008-02-26
Practice with other bottles if trying to cut something in limited
supply. No matter how good you get, some bottles will be lost as
cracks run astray. This was never as easy as the TV ads for the
bottle cutting gimmick (no longer sold) tried to portray.
First sent as MF Reply 11/6/95 8:25 AM
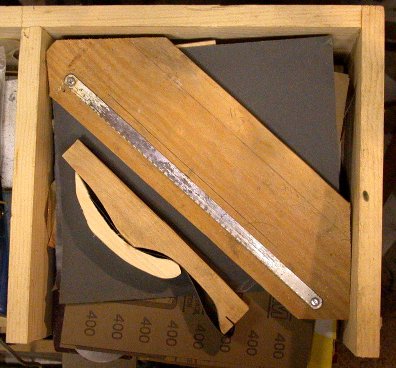
When finished cutting the bottle, the edge is very sharp. The
easiest way to treat the edge is to simply hand grind the edges. This can
be done with the kind of sharpening stones used on pocket knives and chisels,
where each of several grits will cost $5-10. An alternative is a
wooden dowel or a chunk of a broom stick, wrapped with black emery cloth
'sandpaper' where several sizes of grits will cost about $1-2 each. Use
the coarsest grit in each case to knock down the corner of the edges, rounding
it if you wish. Repeat with finer grits, taking out the roughness left
from previous grits. 2003-02-04
 This shows an alternative
way of attacking a bottle. The bottle was cut by laying it in the
open gap between two 2x6 boards in an outdoor bench. The hand was
rested on the board in front, holding the cutter and the bottle
was rotated with the other hand. This gives good support for the
hand, but the larger V is needed with a bottle bigger than this,
in my opinion, or a board needs to be set under the hand to raise
it up. When cutting the bottle lengthwise, it is held with one
hand and the cutter used pushing straight down. This picture can
serve as warning because I cut myself rather deeply on the finger.
I had left the neck laying in the groove and was cutting the long
line when the cutter slipped off the glass and I banged my finger
on the very sharp edge of the neck, putting a cut about 1.5"
long perhaps to the bone, but in line with the tendons and
muscles, so a strong bandage replaced several times a day and it
is healing. The damage you see to the bottle was from trying a
medium head torch on the scribe lines to break the glass - not
very successful as breaks occurred in long curves in addition to
following the neck. 2002-02-07 This shows an alternative
way of attacking a bottle. The bottle was cut by laying it in the
open gap between two 2x6 boards in an outdoor bench. The hand was
rested on the board in front, holding the cutter and the bottle
was rotated with the other hand. This gives good support for the
hand, but the larger V is needed with a bottle bigger than this,
in my opinion, or a board needs to be set under the hand to raise
it up. When cutting the bottle lengthwise, it is held with one
hand and the cutter used pushing straight down. This picture can
serve as warning because I cut myself rather deeply on the finger.
I had left the neck laying in the groove and was cutting the long
line when the cutter slipped off the glass and I banged my finger
on the very sharp edge of the neck, putting a cut about 1.5"
long perhaps to the bone, but in line with the tendons and
muscles, so a strong bandage replaced several times a day and it
is healing. The damage you see to the bottle was from trying a
medium head torch on the scribe lines to break the glass - not
very successful as breaks occurred in long curves in addition to
following the neck. 2002-02-07
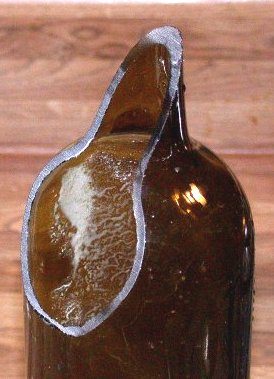
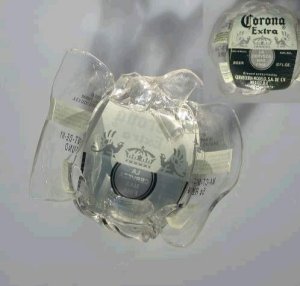 This is a (failed
though interesting) attempt to take apart a
bottle and make a bowl in one step. Originally the bowl was
to be donated to the Empty Bowls so the
label material - which I can't test for lead - was put on the
outside. Obviously the bottle was a Corona beer (inset) and I
chose it because it was 1) Laying on my front yard where it
shouldn't be and 2) it had light thin clear glass. The bottle was
first cut around the neck and tapped on the outside to run the
crack, leaving a piece like the neck in the picture above. Then
the base was cut off around the side and tapped from the inside (more
efficient, less force required.) Then the cylinder of the body
was scored up the sides and tapped inside to break it into front
and back. The back was scored inside (also easier) and divided in
half. The bottle neck was then cut apart into pieces. and the
whole arranged in a bowl mold
for fusing The problem was that while the side pieces sagged and
fused nicely into place, the small pieces from the neck, instead
of filling the gap, fell or folded down into the bowl, leaving an
open gap in the bowl shape. The inset shows the bottom of the
bowl (click to enlarge image) If the bottle was screen printed
hot, the label will normally survive fusing. This one was also
run through the dishwasher to test it. 2002-02-07 This is a (failed
though interesting) attempt to take apart a
bottle and make a bowl in one step. Originally the bowl was
to be donated to the Empty Bowls so the
label material - which I can't test for lead - was put on the
outside. Obviously the bottle was a Corona beer (inset) and I
chose it because it was 1) Laying on my front yard where it
shouldn't be and 2) it had light thin clear glass. The bottle was
first cut around the neck and tapped on the outside to run the
crack, leaving a piece like the neck in the picture above. Then
the base was cut off around the side and tapped from the inside (more
efficient, less force required.) Then the cylinder of the body
was scored up the sides and tapped inside to break it into front
and back. The back was scored inside (also easier) and divided in
half. The bottle neck was then cut apart into pieces. and the
whole arranged in a bowl mold
for fusing The problem was that while the side pieces sagged and
fused nicely into place, the small pieces from the neck, instead
of filling the gap, fell or folded down into the bowl, leaving an
open gap in the bowl shape. The inset shows the bottom of the
bowl (click to enlarge image) If the bottle was screen printed
hot, the label will normally survive fusing. This one was also
run through the dishwasher to test it. 2002-02-07
|
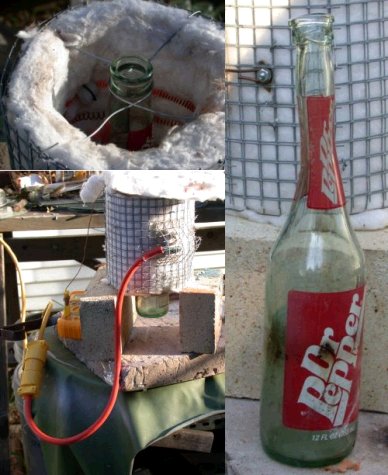
Burning String - I used several soda bottles that I had collected for
fusing and tried several variations. I did not find the results
satisfactory, but they may be in some cases, so read on.2004-12-18
I came across two videos showing the use of acetone (nail polish remover)
that produced better results than shown here. In each case they tie cotton
string on the bottle, remove the string and soak it in a small container
of acetone, replace the string, light it and turn the horizontal bottle on
its long axis while the flame burns with no smoke, then plunge the bottle
into water to snap it. In both videos only a very brief view of the edge
is shown but it appears that both have rough spots. Beer bottle
https://www.youtube.com/watch?v=_A4J7RcdsfM&NR=1&feature=fvwp
Wine
https://www.youtube.com/watch?v=AHxpW60x_KI&NR=1 good captions
2010-03-28
In
a further variation which I have encountered several times just
recently but not tried, again the string is tied tightly around the
bottle and removed, but this time soaked in lighter fluid in a small
bowl before being returned to the bottle and lighted from the bottom
with the bottle horizontal so the flame climbs up and around. When a
crack is heard cold water is dribbled on. Appears to be a cleaner break
and no soot. I have no lighter fluid to test. 2013-12-25
 My first tests were on even walled (Sunkist orange soda) bottles, where I
scribed a line, wetted a string in denatured alcohol, tied it in place and lit
it. The alcohol evaporated and burned so quickly as to provide no heat to
the glass. I was also frustrated that the string I knew to be cotton was
too thin and new string I had bought turned out to be nylon or polyester in
spite of not being marked. My first tests were on even walled (Sunkist orange soda) bottles, where I
scribed a line, wetted a string in denatured alcohol, tied it in place and lit
it. The alcohol evaporated and burned so quickly as to provide no heat to
the glass. I was also frustrated that the string I knew to be cotton was
too thin and new string I had bought turned out to be nylon or polyester in
spite of not being marked.
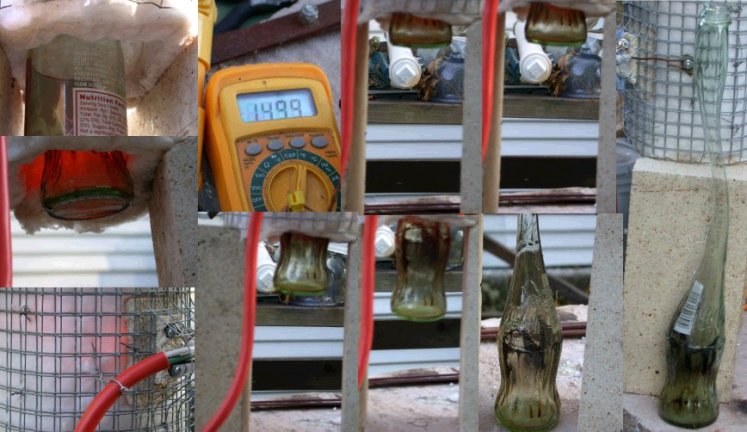
I bought a heavier cotton string at the grocery store. I switched to
kerosene because of its slow evaporation rate. On scribed bottles, with
two wraps of string placed just below and touching the scribed line and the
bottle standing upright, the flame produced a distinctly audible crack at about
the end of burning time. It also produced a black sooty surface.
Unfortunately, the crack followed the scribe halfway around the bottle and then
continued 1/4" higher for the other half. Worse, there was a errant heat
crack that curved about 1/2" below the scribe. So the bottle was cut, but
a lot of grinding would be required to produce an even rim. Several
additional tests were run with essentially the same result. [In the image,
the scribe line is just barely visible against the soot about 1/4" below the
back rim. Note the dip in the rim cut at the front above the lower bulge
of the S. The white visible inside the bottle is the background for the
blue lettering on the other side of the bottle.
Then it occurred to me that the flame would stay along the string if I laid the
bottle on its side, propped on a fire brick so the burn line was out in the air.
This produced less soot and a more controlled flame and with the scribed line,
cracked free, but the crack varied above and below the scribe by 1/8th inch or
more and branch heat cracks showed up.
 I decided to try some tests with just the burning string, no scribe. This
seemed to give results that were as good (or bad) as previously on the even
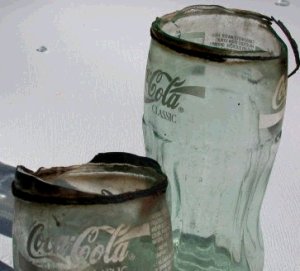
walled bottles. I pulled out a couple of old classic Coke bottles.
Here scribing the line is a real problem. Above the label the bottle is
curved, making scribing on the sloping shoulder difficult for me. Below
the label, the bottle is ribbed making for an uneven surface backed by uneven
thickness. Almost any crack around the bottle would improve on what
I have gotten in the past. I decided to try some tests with just the burning string, no scribe. This
seemed to give results that were as good (or bad) as previously on the even
walled bottles. I pulled out a couple of old classic Coke bottles.
Here scribing the line is a real problem. Above the label the bottle is
curved, making scribing on the sloping shoulder difficult for me. Below
the label, the bottle is ribbed making for an uneven surface backed by uneven
thickness. Almost any crack around the bottle would improve on what
I have gotten in the past.
After I wrapped the string soak in kerosene, tied it with an overhand knot,
arranged the ends nicely along the other strands, lit the fuel and stood and
watched. And watched. And watched. The flame went out and the
bottle didn't break. I got a small scoop of water and touched the drip to
the string - ta ta!! Nice crack. It wandered as much as the scribed
bottles without the scribe hassle. I took off the bottom of the same
bottle (around the ribs) and worked a couple of other bottles, getting the same
results.

So, a burning string works to cut a bottle if 1) a medium heavy smooth cotton
string is used; 2) with kerosene, not alcohol; 3) with the bottle on its side;
4) with the ends carefully tucked in; 5) and a large drop of water is applied to
the string as soon as the fire is out;
IF an edge is OK that varies up and down by a good fraction of an inch and will
have to be ground down a bunch to make a drinking glass or goblet AND the loss
of 1 in 3 or 1 in 4 due to branch crack (which keeps running when grinding is
done.) [2005-11-19 After doing the wire snapping below and seeing how even a
small deviation from square can lead to a big point, I think a better choice on
the string would be to use finer string and go around twice with the knot
running under both strings so its width is a smaller proportion of the burning
line.]STRING CUTTING
HI there, love the website, just thought I'd add my way:
My brother and I started cutting old 2 liter ( I think ) glass bottles when we
were around 12 or so, and we didn't use fire, and had no access to batteries.
What we did have were spools of mason line (the kind thaT brick layers use, it's
usually in yellow or day glow pink) from my fathers construction tool bag.
We would tie one end to a hook in a wall, or even a door knob. The string was
played out about 2 feet or so, and the other end was tied to our belt buckle.
making the string wind once around the bottle, we would put some pressure with
our bodies away from the wall, and run the bottle back and forth along the
string, usually getting the string hot enough that it would melt. Immediately
after the string broke, we would dunk the bottle into cold water, and the bottle
would split neatly in half (or wherever the string was).
Possible problems with this technique:
1. you get tired before the string is hot enough
2. the string breaks before adequate heat is generated
3. the point at which the string crosses itself leaves a little dip or rise
in the bottle
4. The string moves along the bottle as you move it back and forth
To address # 2 if only moderate pressure is applied to the bottle, there is
better chance of getting the bottle hot before it breaks. There is also some
brands of mason line that will last longer than others, but I have never figured
out which.
To address #3 if as you move the bottle back and forth you give the bottle a
slight roll, so that the cross point of the string is moving, it will eliminate
the little dip.
To address #4 if I put a layer of tape (masking, scotch, whatever) where the
string will be, the string will cut quite easily through the tape, leaving a
guide for itself, and making it easy to keep in place.
As I said, My brother make many bottles this way, and had none of them shatter.
the only things that can go wrong are that little dip in the cut surface, and
simply not having the bottle break in two, which just means that you have to do
it again.
Anyway, good luck making bottles,
Adrian S. Moreno
San Ysidro, California.
|
Bottle Neck Guitar
Slider I was contacted by someone in the UK to make a
guitar slider from a wine bottle neck and after looking on the Internet
decided the effort in international mailing since a
place in
the UK makes them in different styles. But I wandered to a
discussion
here
from 6-8 years back and thought some of it was worth borrowing.
Guitar sliders require tuning the guitar to an open chord (so it sounds a
chord when strummed) and then a hard object (because using the finger
across all the strings gets painful) is slid along to make other chords.
The Hawaiian steel guitar is played flat with a steel slider, but the
slider can be a piece of steel or brass held edgewise between two fingers
or a tube slipped over a finger. The tube can also be glass, which
is why there is a section here, and the traditional is a piece of wine
bottle neck for the thicker glass.
Note that getting the neck off the bottle, however scored, is easier than
cutting the bottle, since leverage will snap the neck.
Orgodude
posted 12-13-2002 06:43 Edit/Delete Message Reply w/Quote I thought that I
share my slide making experiences. I read through just about everything
that I could find on the topic of bottle cutting. I haven't tried the
special cutting blades or saws.
The only procedure that consistently gave me relatively clean breaks was
the following. Safety glasses and leather gloves are probably not a bad
idea though I've never had any bad experiences with the procedure below.
1. Draw a line around the bottle neck with a magic marker.
2. Score around the line (only once) with the edge of a triangular file .
Using a triangular file allows you to press down firmly with your thumb
directly over the scoring edge of the file thus creating a score of more
consistent depth. It is important to score only once and try to make a
score line of consistent depth otherwise the bottle breaks unevenly. I
practiced on beer bottles first to get the feel of the procedure and then
moved to thicker glass.
3. Heat the score in a candle flame while rotating the bottle. Soot is
deposited where the flame touches the bottle so you know you are hitting
the score line evenly.
4. While hot, rotate the hot score under some cold running water. Usually,
it breaks cleanly. Most times, you can essentially pull the neck off the
bottle. No tapping, smashing, etc. to potentially send glass shards flying
around the room. [Glass shards on the kitchen counter/floor makes my wife
angrier than practicing the same song for hours on end while enjoying the
tone of my newly cut slide.]
5. If neck doesn't break the first time, then dry the bottle, reheat the
score and cool it again. The thicker glass usually required two
heating/cooling operations.
6. Then file and sand smooth.
posted 12-14-2002 15:26 Files come in a variety shapes and sizes (round,
flat, triangular, needle, etc). The triangular file that I am referring to
essentially describes the shape you would see if you looked at a cross
section (cut it in half and sighted down the end). I should add that you
should use one of reasonable size since I broke a smaller one recently.
The reason that I chose this type of file is two fold. One for leverage
and two because my instructor in a laboratory glass blowing short course
demonstrated that this type of file was very efficient for scoring and
breaking glass tubing. For tubing, one just needs to make a score about
one third of the way around the tube to break it cleanly. Interestingly,
if you score a glass tube all the way around the tube it doesn't break
cleanly perhaps due to uneven stresses introduced into the relatively thin
walled glass.
an McWee From: Worcestershire, England
posted 12-02-2003 02:33 After many years of refining the ancient art of
bottleneck making (and it now being a thriving business for us!), all the
above methods listed work for each individual who chooses to make their
very own, personal bottleneck. We found that a lot of the problems
relating to the straight separation of neck from bottle occurred at the
main score-line, opposite to the point of contact with whatever you use to
break the neck off. We found that if you rest the score line directly on
top of a sharp edged, right-angled piece of metal, with the score line
parallel to the top of the angle and resting into the groove, much of the
stress factor on the line was relieved.....and if i knew how to draw a
diagram on here - i'd gladly show you! Hope that all helps, if not - feel
free to contact me off our web-site at
http://www.diamondbottlenecks.com
Spudmurphy
posted 01-22-2004 04:09 Edit/Delete Message Reply w/Quote Who'd have
thought that this would continue over 3 years. An interesting topic.
I used my trusty glass cutter, whose cutting wheel is supplied with
cutting oil - a mixture of 3 in 1 oil and turps. if you dont have such a
beast just dip your cutter in white spirit.
I found it impossible to run a continuous cut all around the neck, but
used a series of small say one inch scores. - on no account double up over
a score, do it once only. Best use a piece of masking tape with a mark
showing your start/finishing point.
Once the perimeter is scored you have to tap around the score with the
other end of the cutter.
Good taps but not so you would expect to "smash"the end off in one go.
Keep tapping all around and a crack will appear - keep tapping and chasing
the crack around and off it comes.
I did 2 bottles in minutes - even took the annoying lip off the cork end
(about 1/4 of an inch) using the same technique.
eskimo
posted 01-22-2004 20:32 A tile wet saw.
I've got one because I am a tile and stone contractor so I thought before
I give this sage advice I'll go out to the garage and try a couple. Worked
6 out of 7 times clean as a whistle. The one that failed was a thin beer
bottle neck that you wouldn't use for slide anyway but the three thickest
ones were the easiest and cleanest. Now some of you are probably saying
that that's all well and good but you don't have a wet saw. Well every
Home Depot does. It's at the end of the tile aisle and it's for weekend
warriors to get their more complex cuts done. The one near me lets all the
homeowner Joe's make their own cuts so that situation would be easy but if
the one near you has the staff do it just slip 'em a 5 spot and off you
go. Or have your wife ask 'em that always works. Either way you might have
to buy $3 worth of tile put some marks on 'em and pretend you need some
cuts done and slip the bottle in at the end. This will work. Home Depot
people do not care about things like this.
Water jets and a fast spinning diamond wheel. It's a beautiful thing.
mark
posted 11-30-2000 19:32 I recently made 2 new slides from wine
bottles. I found 2 wine bottles with real straight necks and small
openings and cut them using a carbide hacksaw blade. Then polished them
with sandpaper--100-400 grit. I held the bottle by laying it on the
kitchen counter on a bath towel, with the towel folded thicker on one end
to support the neck of the bottle. It worked well, but had to rest the
hands several times in the process! The string and ice water method I
tried as well, but this left too jagged a cut requiring too much sanding.
edroperFrom: Seneca Falls, NY
posted 02-09-2004 10:35 I just cut my first bottle neck using the
carbide rod saw, belt sander, sand paper method. I double cut it and it
turned out great. The bottle is from Goose Watch "Finale" white port made
by Swedish Hill Vinyards here in the Finger Lakes. The neck is almost
perfectly straight, thick glass, fits my pinky perfectly, and is a real
nice green/brown color. Oh yeah, I like the tone a whole lot better than
the brass slide I've been using.
clarkythe1st
posted 02-22-2004 18:11 Thought I'd get busy in the workshop and
rustle myself up a few new slides beofre I wasted all those good bottles
at the recycling centre. Found a great Virgin Olive Oil bottle with a
4.5inch straight section. Taped it and cut it with a carbide tipped saw in
a matter of minutes and then spent a good 15 to 20 minutes with a variety
of sanders to get it just perfect. I had a little skip in my step as I
headed back to my guitar. A little too much skip. Caught my foot on a
cable and smash. Oh well, there's plenty more bottles where that one came
from.
|
|
FURTHER COMMENTS:
#: 126130 S5/Glasswork
01-Oct-95 04:18:03 B: #125764-Cutting Glass Bottles Fm: Gerry
Phibbs/CA[Staff] 76556,624 To: Lynn C. Russ 75327,1237 (X)
Hi Lynn..
It's not a difficult thing to do, but as with most things, it can
require some practice to do well.
Bottle glass is typically very soft, and can be cut fairly
easily, but remember that the bottle glass is also of uneven
thickness, and that can create some problems. Also, with many
bottles used for many things, there's a "relief" at the
bottom, or in the bottom, to allow the bottom to break out if too
much pressure is exerted inside the bottle. Be careful around
this little "relief" which will look like a dent in the
glass, it's the weakest point on the bottle.
Peace -Gerry
Even further comments:
Once the bottle has been scored, there have historically been a
number of methods for cracking the glass, most of which are
messy, some dangerous.
Included are wrapping the line with a nichrome wire and heating
the wire (a transformer is required); wrapping the line with
kerosene or lighter fluid soaked string and lighting the string;
filling the bottle up to the line with water and touching the
line with a hot bar or poker; filling it with oil and plunging in
a hot poker. Some of these latter ones may work without scoring
the line, but probably shatter the glass above the line, leaving
pieces of glass to cut people.
MF
Subject: Re: Bottle Cutter? From: zoron@teleport.com (Douglas
Wiggins) Date: Thu, 29 May 1997 15:08:04 GMT
>>Remember the 60's? Looking for way to cut bottles--or at
least neck.
>>Does anyone sell a bottle cutter in the 90's? Or is there
another way to
I have one of those old bottle cutters, and it is a simple
device which involves a simple wheel-type glass scoring tool,
mounted on a jig which allows it to scribe a score around the
circumference of a bottle (it uses wing-nut-fastened adjustments
to let it be set for different diameters of bottles) - putting a
bottle sideways into a partially open drawer and turning it while
holding a glass cutter on it would probably work nearly as well.
Once the bottle is scored, there were a couple of different heavy-gauge
wire tools, bent in such a way as to make a crude hammer at each
end of the wire (bent so that a rounded edge hit the glass), and
a little gadget was attached to the wire to hold it in the neck
of the bottle (there were two such wires, with one being for
small necks and one for large - the large one just used a three-inch-square
piece of fiberboard, held at an angle so that one of the "points"
of the square went down inside the neck), and the wire was then
tapped along the inside of the bottle, moving around it, until it
broke. The idea was to start with a slight tap, and increase the
strength until it started to crack, possibly hunting around the
bottle until a place was found where it would start to crack.
It took a bit of practice, but, once one got the hang of it, it
was possible to cut bottles cleanly nearly every time.
3/14/98 In article <350AF691.757D@digitalexp.com>, Suz writes:
>reading your post about the coke etc bottles. I must say it
came out
>nicely! Now, if I could just figure out a way to cut rings
out of a
>bottle without breaking 3/4 of it! The two rings I have took
me a
>twelve-pack! Is there a better way? btw: i had purchased the
"bottle
>cutter" from Glass Crafters, and it is rather a hit
& miss affair. It's
>plastic, and tends to slide around, and I believe the cutting
wheel is
>rather cheap. Any ideas? -suz-
A. Cut the bottles at least 24 hours after finishing the 12 pack
:-)
B. Open the bottle by cutting as far away from the rings as
possible (see below)
C. Skip using any "bottle cutter" and make your own
much stronger rig.
I cut my bottles (remember the outside of Coke bottles is uneven,
ridged, etc. compared to most other bottles) by first making a
wooden trough to hold the bottle while I turned it. Basically I
chose two pieces of scrap wood, one for the base and another just
wide enough to place the cutting hand in a good position with
respect to the bottle - I think I used 1x3 and screwed it to the
edge of the base.
Also on the base I put a piece of wood scrap about 3/4"
thick just far enough from the upright to keep the bottle in
place and another small piece to position the bottom of the
bottle.
I used a perfectly standard (cheap) hardware store glass cutter.
Because of what I wanted to do, I made my first cut near the base
of the bottle as I recall, although I did a few up on the bulge
at the base of the neck. Turning the bottle in the trough with
one hand, I held the cutter in position with the other to pivot
against the glass.
To run the score, I made my own inside breaker by using 1/4"
steel rod. I bent about an inch of the end to a sharp L in a vise
and then cut off most of the inch until the short leg would fit
inside the neck of the bottle. I then filed the short leg to a
blunt point. Depending on the bottle, I then bent the long part
of the rod to fit the pointer under the shoulder of the bottle if
I needed. As I recall, I couldn't find any wooden or rubber balls
so I roughly shaped a scrap of wood to a ball end, drilled it
undersized and pushed it on the rod to act as a pivot for the
rapper.
Once I scored the line around the bottle, I rapped the crack
around it and took the bottle into two pieces. What happened next
depended on what parts of the design I wanted to use. If
necessary, I ringed the bottle again and rapped it apart. I found
that whether I used the neck rapper from the neck or the ball
rapper on the cutter depended on how the bottle seemed to be most
attackable.
Since you want to make rings, I would suggest taking the bottom
off then scoring above and below your rings and tapping with the
ball through the bigger bottom opening (use gloves or something
to keep from cutting yourself on the sharp bottom edge. If you
felt more comfortable, you could take an abrasive stone to the
newly cut edge.) I usually wanted pieces of the pattern running
up and down the bottle, so I would lay the bottle section down,
reach in through the opened bottom with the cutter (gloves) and
pull the cutter from inside toward me. (Doing one or
more different lines before rapping depending on my mood.) I
would then rap the inside score from the outside of the bottle,
much easier to follow, I found. Of course I ruined a few, but I
kept all the pieces to see what I could do with
short fragments of text, parts of logos, etc. Bottle glass is
uneven in thickness so it tends to produce "creative"
shapes.
Subj: cutting beer bottles
Date: 98-03-15 20:17:40 EST
From: (Stanton, Susie)
To: (MikeFirth)
Hi Mike, gosh thank you for the wonderful post to my question
'is there a better way'. just last night i was having a few beers
with a local carpenter/craftsman and we talked about making a
cradle so i could turn bottles. bobbalou said he thought he had a
pretty good idea of what i want and he will "get right on it".
(course, in island time, that could
be anywhere from 3 months to a year. it's a whole 'nother time
zone here!) so i decided that i am going to try to make what you
have described. but i am having a hard time picturing the thing!
i -was- thinking in terms of having an uprighted end, with a half-circle
cut out, to rest the base of the bottle on, but then the neck
part threw me; is that the scrap 1x3 you meant? also the part for
piece 'just wide enough to place the cutting hand on", is
that so your hand remains firmly set while you turn the bottle?
boogers! i am sorry to ask you so many questions about this!
perhaps i will get down under the house (we are all on 12' stilt/pilings
here) and rummage through my "treasure pile", and see
what i can come up with. i sure do miss that 1970's bottle cutter
they used to make. oh and btw, i also did the "tie cotton
string wetted with kerosene around the base, light, let burn,
plunge into cold water" and it does work! but the wine
bottle cracked a lot up above the break. the bottoms of the wine
bottles have that neat "thumb hole" and i am looking
forward to seeing what it will turn into! i am not an artist at
all, and know it, but i sure do like messing with these things
and seeing what they can turn into. thanks again for that great
informative post!
-suz-___________________________________________________________
________
St. George Island, FL ~ 65 Miles from the nearest WalMart - thank
God!
http://www.digitalexp.com/~users/ses
Make a V of wood - a long trough to lay the bottle down in.
One side should be about the size of the bottle laying on its
side.
The other side should be a bit wider so space is handy to nail
down a scrap of wood.
It should be longer than the bottle, somewhat.
Lay it so the wider side is on the work surface and the narrower
one sticks up.
Lay the bottle in place, letting the neck stick out the end
enough to grab it.
Mark the location of the bottom of the bottle so you can nail a
scrap of wood there to keep it from moving down the trough.
Move a piece of wood into the side of the bottle on the bottom
wood so the
scrap just touches and mark it.
Remove the bottle and nail/screw the two pieces of scrap in place
to align the bottle.
|